
Installing Bali Thatch Roofing
We offer Balinese thatching as a DIY product with easy to read installation instructions, so YOU save money.
Installing Bali thatch is a simple process which requires very little skill. Many of our clients are not handy yet our helpful instructions and guidance have assisted them to achieve a very professional result.
DIY Installation
To ensure longevity (approx 12 years), it is recommended the roof pitch should be no less than 30 degrees.
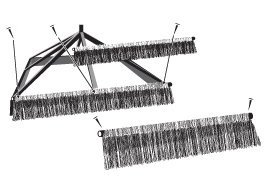
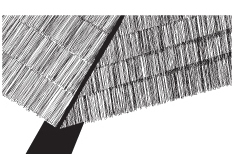
There are two sides to a Bali thatch strip and a Bali thatch corner hip:
- On the thatch strip, long thatch is the outside face, short fringe is installed underneath.
- The corner hip is nailed with the bamboo batten facing down in contact with the corner rafter.
 |
1. Begin the layering process of the thatch strips at the bottom of the roof structure, adjacent to the fascia. Nail through the bamboo batten to the rafters using either a nailgun or hammer. |
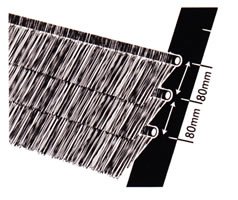 |
2. Then each strip is to be nailed 80mm apart. Pre-mark the rafters in 80mm increments. Place the next strip above the first strip and nail the second bamboo batten 80mm from the first bamboo batten. The layering effect at 80mm increments is critical to make the thatch roof waterproof. |
 |
3. Thatch strips are cut in the middle of the corner rafters and secured by nails. Step 5 will cover any gaps. |
 |
4. Continue up the roofline cutting strip and nailing until the entire structure is covered. |
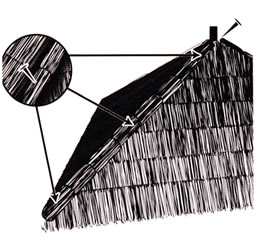 |
5. Place the tapered end of the corner hip at the top with the batten facing underneath. Nail to the corner rafter - bottom, top and in the middle. |
| 6. On completion of installation wet and rake the entire roof to tidy the thatch. The edges can be left 'shaggy' or 'trimmed' with clippers to create the look you require. |
Bali Thatch Installation Service

If you do not wish to install your Balinese thatching yourself, we offer the services of thatching installers who have years of installation experience.
Many of the jobs featured in our photo gallery are jobs they have installed. This includes new jobs and re-thatching existing structures.
Landscape Designer
To our customers we also offer the services of a fully qualified landscape designer who, with his team, specialises in tropical Asian-style gardens and design concepts.
We also work side by side with many customer's builders and landscape gardeners to achieve the perfect end result.
Bali Hut Kit
If it is more a Bali Hut Kit you are interested in we also offer these through our carpenters.
The Bali Hut Kits are an easily assembled project that you can do yourself. Alternatively our carpenters can assemble your Bali Hut Kit for you. All Bali Hut Kits come fully labelled, pre-cut, pre-drilled, with all the nuts and bolts you need to put it together.
For more information please see our Wholesale DIY Bali Huts website.
Downloads